Our Raspberry Pi robot has proven to be very popular, as it allows people to easily put together a fun little robot, that they can drive around using a smartphone, tablet or computer, whilst viewing the world with the camera on the robot. However, fun as this is, it’s hard to view this ‘robot’ as being much more than a remote controlled toy. Our personal view has always been that a robot should be autonomous in some way, and that’s why we’ve been working on a programming interface for our robot that will let users of our robots create cool, autonomous behaviours.

Bring your robot to life with Python and OpenCV
The interface is a Python library called py_websockets_bot. The library communicates with the robot over a network interface, controlling it’s movements and also streaming back images from its camera so that they can be processed with the computer vision library OpenCV. Communicating over a network interface means that your scripts can either run on the robot, or they can run on a separate computer. This feature is really useful if you want to use a computer more powerful than the Pi to run advanced AI and computer vision algorithms, or if you want to coordinate the movement of multiple robots.
In this post we show you how to install the interface library, and provide some example programs, that show you how to make the robot move, how to retrieve images from the camera and how to manipulate the images with OpenCV.
Software Overview
Before we talk about installing the py_websockets_bot library, the image below should hopefully give you a better idea about how the software on the robot works.

Overview of the Raspberry Pi Robot software
At a low level, we use an Arduino compatible board called a Mini Driver to control the hardware of the robot. Running on the Mini Driver is a sketch that listens over serial USB for commands from the Pi, whilst sending back status data (at the moment just battery voltage, but other sensors could also be added).
On the Pi, we run a web server written in Python that provides a web interface, and which listens for commands over the WebSockets protocol. When it gets commands, it sends them onto the Mini Driver via serial USB. The other program running on the Pi is a camera streamer called raspberry_pi_camera_streamer. This is a custom Raspberry Pi camera program we’ve written that streams JPEG images over the network. It can also stream reduced size images (160×120) for computer vision, along with motion vectors (coarse optical flow data) from the Raspberry Pi camera.
To control the robot, you can either use a web browser such as Chrome or Firefox, or now, you can also write a program using the py_websockets_bot library. Both of these will communicate with the web server and the camera streamer on the Pi using WebSockets and HTTP.
It may seem a bit over complicated to run a web server, and to communicate with this, rather than controlling the robot’s hardware directly, but it gives us a lot of flexibility. The web interface can be used to observe the robot whilst it’s being controlled by a script, and as mentioned before, control scripts can be written just once and then run either on the robot, or on a separate computer, depending upon how much computing power is needed. Also, in theory, you can write your control scripts in whatever language you like, as long as you have a library that can speak WebSockets. We have provided a Python library, but there are WebSockets libraries available for many other languages, such as Javascript, Ruby and the .NET framework.
Installing the Software
Starting with the standard Dawn Robotics SD card, run the following commands on your Pi to make sure that the robot’s software is up to date
cd /home/pi/raspberry_pi_camera_streamer
git pull
cd build
make
sudo make install
cd /home/pi/raspberry_pi_camera_bot
git pull
Reboot your Pi to use the updated software.
Installing py_websockets_bot on a Linux PC or the Raspberry Pi
Run the following commands to install the libraries dependencies
sudo apt-get update
sudo apt-get install python-opencv
then
git clone https://bitbucket.org/DawnRobotics/py_websockets_bot.git
cd py_websockets_bot
sudo python setup.py install
Installing py_websokects_bot on Windows
This is trickier but involves the following steps
- Install Python 2.7.3 – https://www.python.org/download/releases/2.7.3
- Install Numpy 1.6.2
- Goto http://sourceforge.net/projects/numpy/files/NumPy/1.6.2/
- Download and install numpy-1.6.2-win32-superpack-python2.7.exe
- Download OpenCV 2.3.1 – http://opencv.org/downloads.html – 2.3.1 Windows superpack
- Unpack OpenCV to any folder
- Goto opencv/build/python/2.7 folder
- Copy cv2.pyd to C:/Python27/lib/site-packeges.
If needed, more details for OpenCV setup on Windows can be found at http://docs.opencv.org/trunk/doc/py_tutorials/py_setup/py_setup_in_windows/py_setup_in_windows.html
- Now download the py_websockets_bot library (repository) from https://bitbucket.org/DawnRobotics/py_websockets_bot/downloads
- Unpack the library to a folder and navigate to it on the command line
- Run the following command from the command line
c:\Python27\python.exe setup.py install
Installing py_websokects_bot on a Mac
We don’t have a Mac to do this, but hopefully, the installation process should be similar to installing on Linux. If there are any Mac users out there who could give this a go and let us know how they get on, we’d be very grateful. ![]()
Making the Robot Move
Making the robot move is very straightforward, as shown in the code snippet below
import py_websockets_bot

bot = py_websockets_bot.WebsocketsBot( "ROBOT_IP_ADDRESS" )
bot.set_motor_speeds( -80.0, 80.0 )    # Spin left
For ROBOT_IP_ADDRESS you would put something like “192.168.42.1″ or “localhost” if the script was running on the robot. The code snippet connects to the robot, and then starts it turning left by setting the left motor to -80% speed and the right motor to +80% speed.
The example file motor_test.py shows more of the commands you can use. It can be run from the py_websockets_bot directory by using the command
examples/motor_test.py ROBOT_IP_ADDRESS
Getting and Processing Images from the Robot
One of the really exciting thing about using the Pi for robotics, is that it has a good standard camera, and enough processing power to run some computer vision algorithms. The example file get_image.py shows how to get an image from the camera, and then use the OpenCV library to perform edge detection on it.
Run it as follows
examples/get_image.py ROBOT_IP_ADDRESS
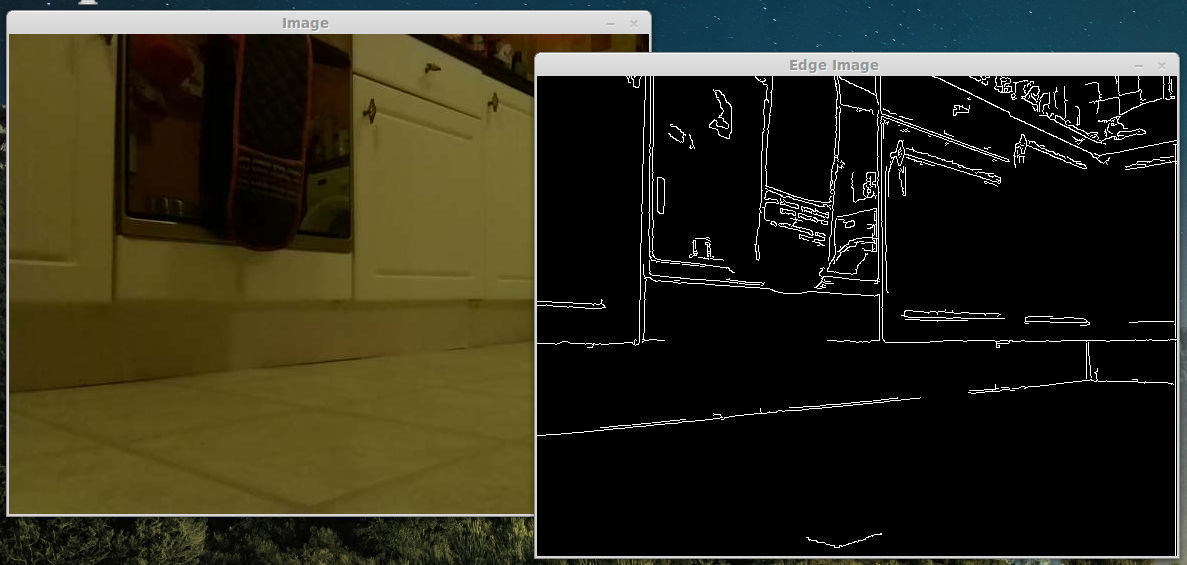
The result of running edge detection on a camera image from the Raspberry Pi robot
Small Images
The Pi can run computer vision algorithms, but the processing power of its CPU is very limited when compared to most laptops and desktop PCs. One crude but effective way to speed up a lot of computer vision algorithms is simply to run them on smaller images. To support this, the py_websockets_bot library also offers routines to stream ‘small’ images which have been reduced in size on the GPU of the Pi. The standard camera images from the robot are 640×480, and the small images are 160×120.
Getting Motion Vectors (Optical Flow) from the Robot’s Camera
The Raspberry Pi contains a very capable GPU which is able to encode images from the Pi camera into H264 video in real time. Recently, the clever people at Pi towers added a feature to the Pi’s firmware that allows the vectors generated by the motion estimation block of the H264 encoder to be retrieved. What this means, is that it’s possible to get your Pi to calculate the optical flow for its camera images, practically for free! (0% CPU) We haven’t managed to do anything cool with this yet, but we’ve provided routines to retrieve them from the camera so that other people can.

The motion vectors from waving a hand in front of the Raspberry Pi Robot’s camera (no really, squint a bit…)
To see this for yourself, run the following example
examples/display_motion_vectors.py ROBOT_IP_ADDRESS
Taking Things Further
Hopefully you can see that there are lots of possibilities for creating cool behaviours for your robot using the py_websockets_bot library and OpenCV. For example, you could write a script to get the robot to drive around your home. Perhaps you could get it to act as a sentry bot, emailing you an image if it detects motion. Or perhaps you could get it to detect and respond to people using face detection.
You can get more details about the capabilities of py_websockets_bot in its documentation here, and also the documentation of OpenCV can be found here. If you have any questions about the py_websockets_bot library, please post on our forums, You can also use our forums as a place to share your robotic projects with the rest of the world. ![]()
So awesome, can’t wait to implement it Great job!
Very interesting!
I tried to follow along but got stuck on the streamer. Compiling went fine but running raspberry_pi_camera_streamer didn’t work. I see the camera’s light come on and I see this output:
Image encoder buffer num 3, buffer size 81920Image encoder buffer num 3, buffer size 81920
but nothing loads in the browser.
The pi is full updated (incl a regular dpi-update).
Any ideas?
PS maybe it’s a good idea to enable a bug tracker on bitbucket?
Hi Marcel,
Sorry, I think I wasn’t clear enough in the raspberry_pi_camera_streamer instructions. It sounds like the camera streamer is working. It’s just that http://RASPBERRY_PI_IP_ADDRESS:8080/?action=stream won’t work in Chrome, in fact I’ve only tested it properly in Firefox…
Something like the following html file will hopefully work better in more browsers
Hope that helps. If there are problems, then you can download our SD card image and use it in a Pi with a camera, even when not attached to a robot. This should hopefully give a working example for a web page at least.
Regards
Alan
Hi, I think I have installed correctly to windows 7 laptop… (Your instructions were quite good on a fairly “messy” installation)
I have connected my laptop from my normal router to the Pi_Mini_Robot.
I am trying to get a simple example program that you wrote will or should expect it to work the way I have done it.
i.e. after opening “IDLE Python GUI” and opening the “motor_test.py”, then amending the line to:
parser.add_argument( “hostname”, default=”Pi_Mini_Robot”, nargs=’?', help=”192.168.41.1″ )
(I have tried a few other permutations!!)
Pressing F5 to run the program/ code.
I get the following response in the “Python Shell”
******* message shell response ***********
Connecting to ws://Pi_Mini_Robot:80/robot_control/websocket
Traceback (most recent call last):
File “C:\opencv231\DawnRobotics-py_websockets_bot-2cf9c47ea171\examples\motor_test.py”, line 20, in
bot = py_websockets_bot.WebsocketsBot( args.hostname )
File “C:\Python27\py_websockets_bot\__init__.py”, line 244, in __init__
self._websocket = websocket.create_connection( url )
File “C:\Python27\py_websockets_bot\websocket\__init__.py”, line 214, in create_connection
websock.connect(url, **options)
File “C:\Python27\py_websockets_bot\websocket\__init__.py”, line 464, in connect
self.sock.connect((hostname, port))
File “C:\Python27\lib\socket.py”, line 224, in meth
return getattr(self._sock,name)(*args)
gaierror: [Errno 11004] getaddrinfo failed
>>>
***************************************************
From this, can you tell me what could be wrong, I assume it would be quite a simple oversight/ error?
Hopefully, this may help others in the same (how the hell do I get started) position!
Thanks
Mick
Incidentally, I am using a BEC from hobbyKing (I fly model aircraft) and It has a low voltage beeper on it, therefore get an indication when the 5v drops too low.
Hi Mick,
You would need to restore the line to the original
parser.add_argument( "hostname", default="localhost", nargs='?', help="The ip address of the robot" )Basically this is configuring a command line parser for the script so that it has an argument called hostname that takes the network address of the robot. The default value of localhost means that it will try to attach to a version of the robot web server running on the same computer (this is for when scripts are running on the Pi robot).
I’ve not had a huge amount of experience with running IDLE, but the way I’d run this to begin with is to open up a command line prompt, navigate to the directory containing motor_test.py and then run
python motor_test.py 192.168.42.1Where 192.168.42.1 is the IP address of the robot (this may be different if you’ve plugged it into ethernet)
Once you’ve confirmed that that works, then it may be possible to configure IDLE so that it passes command line arguments to the program. Alternatively, to set the default network address to be the robot’s address you would change that line to be
parser.add_argument( "hostname", default="192.168.42.1", nargs='?', help="The ip address of the robot" )Hope that helps.
Regards
Alan
Actually, thinking about it, on windows, the thing you may need to type at the command line could be
c:\Python27\python.exe motor_test.py 192.168.42.1
As python may not have been added to your PATH environment variable.
Sorry, I’ve got a bit tied into Linux/Ubuntu over the last 5 years.
Regards
Alan
Alan,
Amazing… All is working. (using IDLE, the command line failed)
It was the following line that confused me, (help=”The ip address of the robot”)
parser.add_argument( “hostname”, default=”localhost”, nargs=’?', help=”The ip address of the robot” )
I took it too literal and thought this was the ACTUAL IP address!!
I tried the battery_test.py to check and after changing the IP address, perfect.
Python 2.7 is actually IDLE for windows, confusing with the Raspberry pi have the same program name.
I Must remember not to try and browse the Internet when connected to the PI robot!!
I will now be setting up my grandsons PC for accessing the pi_robot
Really excellent work.
Mick
Hi
I have managed to get a few different types of sensors to report values back to my pi’s usi ng the latest SD image on both REVB and REVB+ 4 Wheeled drive robots. I have followed alan’s advice to tie the trig and echo pins on my 4 pin ultrasonic sensor together and got a reading that responded to my moving hand. I am also using some i2c sensors but I am using a linksprite raspberrypi hub/ interface with arduino IDE code to read them….not proficient or unable to find python example code. Basically now I know all my sensors work on this robot…but need to write up the sensor config.py files for each to get them to display via websockets. It displays temp…light or dark…lines…motion…compass…3 axis accelerometer…. now to get sound or speech recognition….HAL9000 here I come.